Tools you'll need
- Tape measure
- Pencil
- Combination square
- Circular saw or miter saw - A handsaw works too, just slower
- Drill / driver
- 1 1/4" hole saw or spade bit - For the entry hole; size depends on target species
- Sandpaper - 120 and 220 grit
- Safety glasses
- Bar clamp
Materials
- 1 board, 6 ft long 1x6 cedar board - Cedar is rot-resistant and birds prefer untreated wood
- ~16 #8 × 1 1/4" exterior wood screws
- 1 Galvanized hinge - For the cleanout panel
- 2 Eye screws or wire - For hanging
- Optional: exterior wood finish - Skip the inside — birds prefer raw wood
Skip the math - the Fixie iOS app generates a per-project cut list for the exact dimensions you pick, with kerf accounted for and one-tap sourcing for the lumber.
Step by step
Cut the six pieces from one 1x6
A standard birdhouse uses six pieces: front, back, two sides, floor, and roof. From a 6 ft 1x6 you can cut all six with kerf to spare. Use the cut list calculator below if you want to verify your dimensions before cutting.
Drill the entry hole
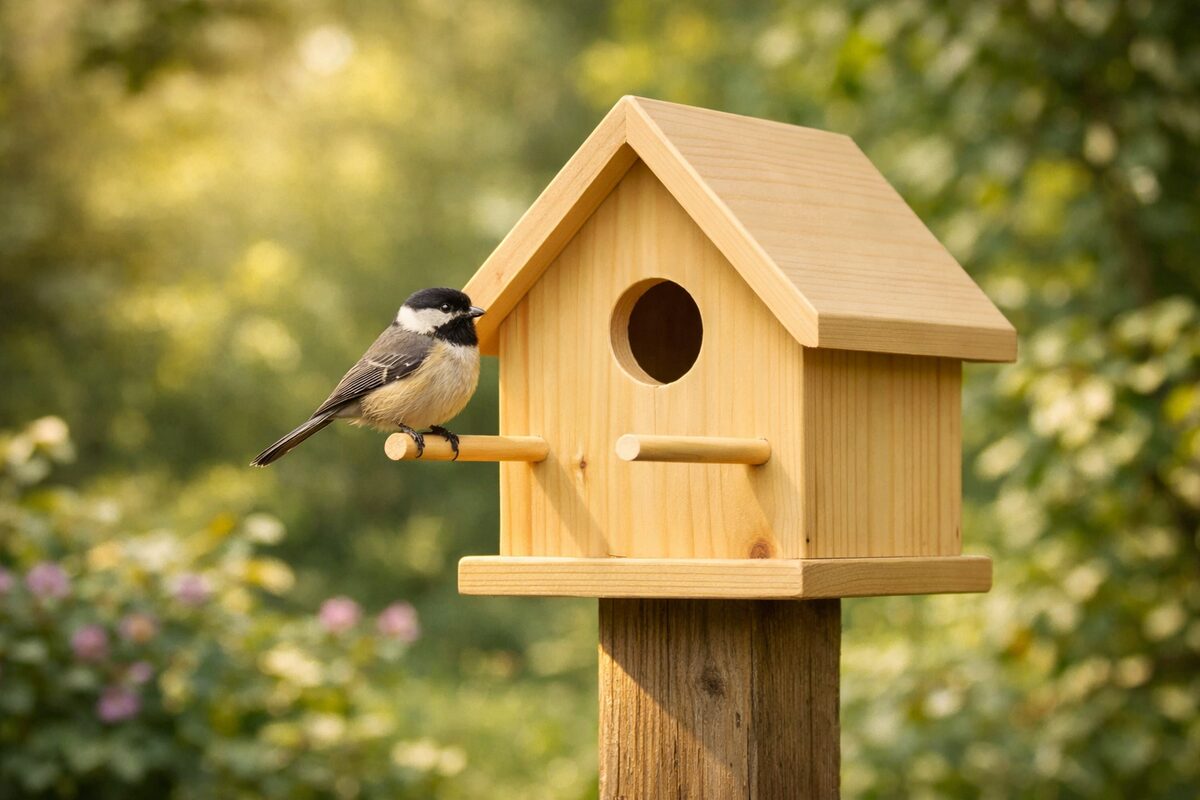
Pick a 1 1/4" hole for chickadees and wrens, 1 1/2" for nuthatches, 1 1/8" for titmice. Center the hole 6" up from the floor on the front piece. Drill from the show side to avoid blow-out on the back.
Add ventilation and drainage holes
Drill four 1/4" holes near the top of each side piece for ventilation, and four 1/4" holes through the floor for drainage. Birds avoid stuffy, damp houses — these tiny holes make a big difference.
Pre-drill all screw locations
Cedar splits easily. Pre-drill every screw location with a 1/8" bit and countersink. This is the difference between a tidy build and frustrating cracks.
Assemble the box
Screw the sides to the back, then add the front. Slide the floor in last so it sits 1/4" up from the bottom edge — this keeps the floor dry. Leave the roof for last so you can attach it with a hinge for cleanout access.
Hinge the roof
Attach the roof with a small galvanized hinge along the back edge. Add an eye screw and a small piece of wire on the front so you can latch it shut. Cleanout access matters — birds reuse the box yearly only if you empty old nesting material each fall.
Skip the finish on the inside
A clear exterior sealer or beeswax-based finish is fine on the outside. Never paint or finish the interior — VOCs and slick surfaces both deter nesting birds. Cedar weathers gracefully on its own anyway.
Mount it the right way
Hang at 5–10 ft on a pole or tree, away from heavy foot traffic. Face the entry hole away from prevailing wind and away from afternoon sun. A predator baffle on the pole keeps cats and raccoons out.
Tips
- Use cedar or untreated pine — never treated lumber, which is toxic to birds.
- Skip a perch under the entry hole. Cavity nesters do not need one, and predators use perches as a foothold.
- Roughen the inside front below the entry hole with a saw blade — fledglings need texture to climb out.
- Check the box every fall and empty old nesting material. Birds prefer a clean cavity each spring.
- If you live in a hot climate, paint the roof a light color — interior temperatures matter for nestlings.
FAQ
How long does it take to build a birdhouse?
A first-time builder can finish a birdhouse in 2–3 hours: about 30 minutes for cuts, 30 minutes for drilling, an hour for assembly, and time to let the finish dry. Experienced builders can do it in under an hour.
What size hole should the entrance be?
Match the hole size to the bird species you want: 1 1/8" for titmice, 1 1/4" for chickadees and wrens, 1 1/2" for nuthatches, 1 9/16" for bluebirds. Larger holes invite house sparrows and starlings, which displace native cavity nesters.
Should I add a perch?
No. Cavity-nesting birds don't need perches, and adding one helps predators reach inside the box. Skip it.
What kind of wood works best?
Cedar is the gold standard — naturally rot-resistant, lightweight, and untreated. Untreated pine works too but won't last as long outdoors. Avoid pressure-treated lumber and plywood (the glues are toxic to nestlings).
Build it, guided every step
The Fixie iOS app turns this plan into a customized build for your space - pick your dimensions, get an auto-generated cut list, order materials in one tap, and follow the steps with 3D previews.
Download Fixie on the App StoreMore beginner projects